Compiling L4T for the Jetson Nano on the EchoPilot AI
Instructions for customizing the device tree and compiling the kernel for the Nano on EchoPilot AI
When a Jetson Nano module is included with an EchoPilot AI purchase, it is flashed with a custom Linux for Tegra (L4T) image which includes support for the hardware and pin configuration of the EchoPilot AI. If you wish to build/update the kernel for use with the EchoPilot AI, the instructions below will provide the information and files you need to ensure your custom image remains fully compatible with the EchoPilot AI hardware. When compared to a standard Nvidia development carrier board, the primary differences in the EchoPilot AI hardware are:
- The EchoPilot AI does not have an I2C HDMI controller
To minimize console errors due to (1), the kernel must be compiled from source and flashed to the Nano using the Debug USB port and recovery mode. The following instructions will walk you through the process.
Warning
These instructions were developed and tested on Ubuntu 20.04 LTS (with a Windows machine used for the Excel pinmux change). We recommend using a physical machine running Ubuntu 20.04 LTS.
These instructions assume you are using a Production Jetson Nano P3448_0002 SOM. These instructions will not work with the SOM included with a Jetson Nano developer kit.
What you will doing:
- Download and setup the necessary files
- Replace .dtb file and create a extlinux.conf file
- Generate the image and flash the device
So buckle up and let's get started.
_These instructions are adapted from the the excellent document by Ridge Run How to build NVIDIA Jetson Nano kernel along with documentation pulled from Nvidia's forums. Some minor changes are included from this document because the last update was for LT4 32.3.1.
Note that Nvidia has dropped software support for the Nano. It has a planned EOL of 2027, but software updates are no longer being made to support it.
Download and Setup Necessary Files
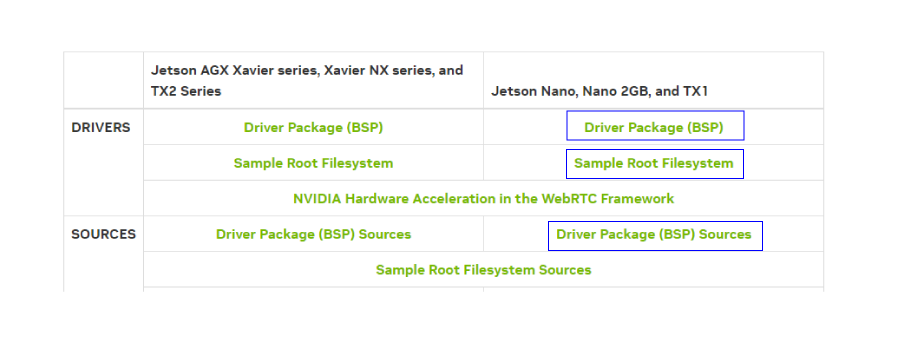
Note that you will need to create an NVIDIA developer account and login to download, so if you do not have a developer account please set that up before proceeding. Next you will need to download three packages from Nvidia: Driver Package (BSP), Sample Root Filesystem and Driver Package (BSP) Sources.
These instructions were developed using Jetson Linux 32.7.3, you can not use releases beyond 32.7.x as the Nano is no longer supported by Nvidia for newer software releases.
The files to download are highlighted in blue below:
Note
The instructions below assume that the downloaded files are downloaded to the ~/Downloads/ folder.
Extract Driver Package (BSP)
Note: the filename below will be different if you download a different version.
Extract kernel sources (Driver Package (BSP) Sources)
In the public_sources.tbz2 (BSP sources) zip file, there will be many other zipped files inside, but we are only interested in kernel_src.tbz2. Extract this file into a folder to named sources within the Linux_for_Tegra folder. The steps are:
mkdir ~/Downloads/temp
tar -xf ~/Downloads/public_sources.tbz2 -C ~/Downloads/temp
mkdir ~/Nano/Linux_for_Tegra/sources
sudo tar -xf ~/Downloads/temp/Linux_for_Tegra/source/public/kernel_src.tbz2 -C ~/Nano/Linux_for_Tegra/sources
cd ~/Nano/Linux_for_Tegra
sudo ./source_sync.sh -t tegra-l4t-r32.7.3
Extract sample Root File System (Sample Root Filesystem)
Extract contents into Linux_for_Tegra/rootfs/.
mkdir ~/Nano/Linux_for_Tegra/rootfs
sudo tar -xf ~/Downloads/Tegra_Linux_Sample-Root-Filesystem_R32.7.3_aarch64.tbz2 -C ~/Nano/Linux_for_Tegra/rootfs/
sudo ./apply_binaries.sh
Note
Before “apply_binaries.sh” is run, the content in “Linux_for_Tegra/rootfs/” is purely Ubuntu. After “apply_binaries.sh” the “rootfs/” will contain NVIDIA content, e.g, drivers for the GPU and some firmware.
Get the EchoPilot .dtb and extlinux.conf files
The files you will need to replace include the device tree binary (.dtb) and extlinux.conf files. These files can be obtained from the echopilot_ai_bsp repository https://github.com/EchoMAV/echopilot_ai_bsp. Use the steps below to clone and install these files:
Clone the files:
Checkout the appropriate branch for your EchoPilot AI board revision. For example, EchoPilot AI Rev1B hardware: Run the install script to copy the dtb and extlinux.conf files into your Linux_for_Tegra folder. The usage is./install_l4t_nano.sh [Path to Linux_for_Tegra], e.g.:
Ensure this script completes with no errors before proceeding with flashing.
(Optional) Create a Default User and Accept the License
This step is optional, if you do not do it, then after the flash you will need to connect to the Jetson via a terminal application using the interface enumerated on the Jetson Debug port (J25) AFTER the flash is complete. You'll be greeted with a setup interface prompting you to accept Nvidia's license, set up the network, set up the default user, etc. To avoid this step, you can create the default user and accept the license prior to the flash using the command below.
In the above, you can change the username-u, password -p and host name -n to whatever values you prefer.
Flash device
Important
While not shown in the images below. The EchoPilot AI should be plugged into a Carrier Board for these steps, as that is how the Jetson module is powered.
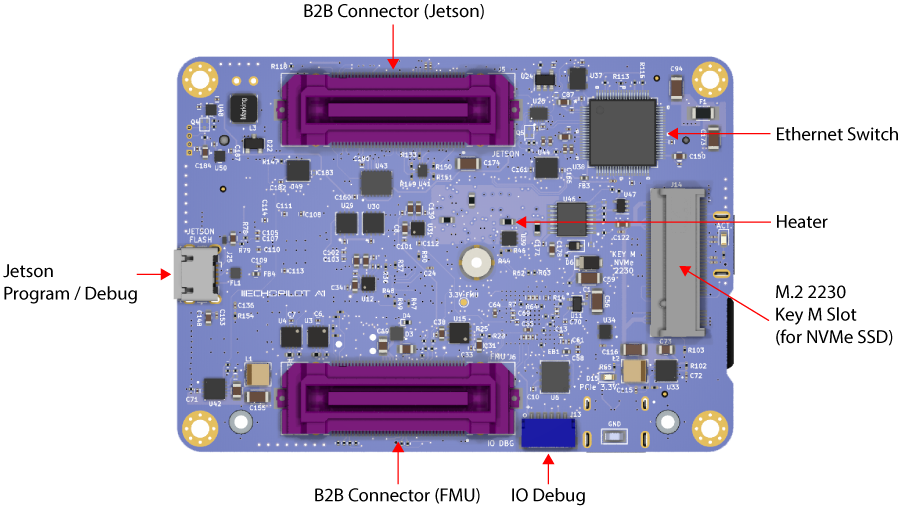
- Plug in a micro usb cable to the Jetson Debug port (J25) on the EchoPilot AI. Refer to the image below for the Jetson Program / Debug connector on the left side.
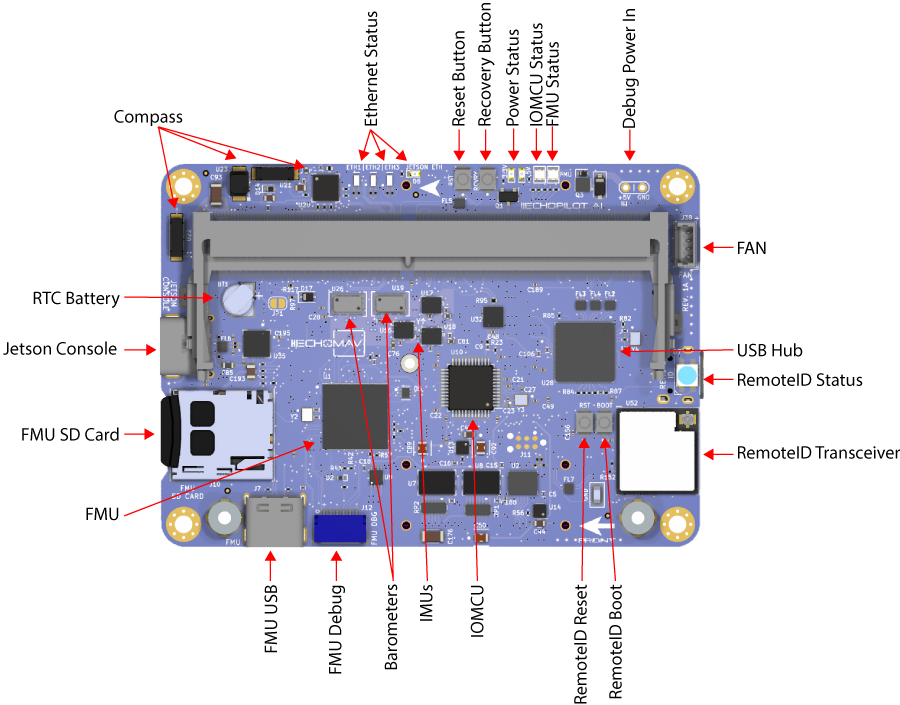
- Hold the recovery button down as power is applied. (see image below for location of the recovery button).
- Apply power via the XT30 connector on the carrier board, and release recovery button after a few seconds.
- Flash device using the command below: